Every project presents its own challenges. What works perfectly for boring a run of aerospace components probably wouldn’t be ideal for boring gearbox housings. Shops need to make sure they always use what works best for the job—and that includes their cutting configurations.
At times, jobs might call for single-point roughing or interpolation with milling cutters. But both those methods have limitations—which is where twin cutting comes in. Often, especially in the case of industries that use castings or forgings, it’s the ideal avenue. And if you’re using twin cutting for your boring needs, you’ll have to choose between two options: balanced cutting or stepped cutting. Let’s review the pros and cons of each.
What is balanced cutting?
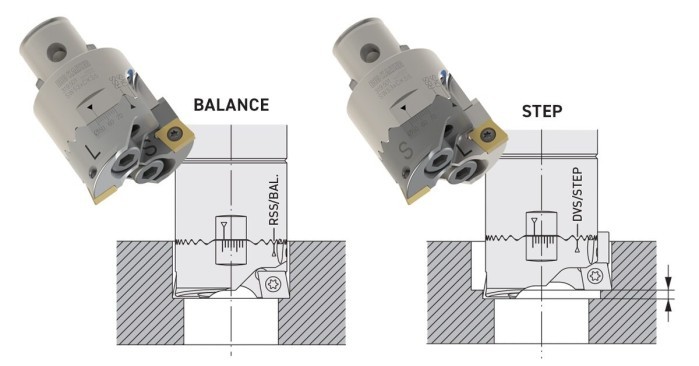
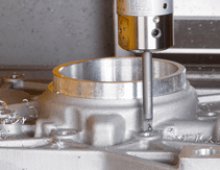
In this configuration, the insert cutting edges are aligned with one another in length and diameter. Radial forces cancel each other out and sends axial cutting forces straight back into the spindle.
3 benefits of balanced cutting
- Better positional accuracy and roundness. By using two cutting edges opposing each other, operators can ensure the tool stays on the path. This produces straight, perfectly round holes—which makes subsequent finishing operations more reliable.
- Less vibration. Since the opposed cutting edges transfer cutting forces axially back to the spindle, tools can cut efficiently without deflecting or producing chatter with poor surface finishes. That’s even the case for longer tools, making this ideal for deep holes.
- Higher productivity. Balanced cutting greatly reduces cycle times compared to what’s possible with single-point roughing tools or interpolation with milling cutters. Machining with two cutting edges at once provides enough extra stability to allow a feed rate two to four times higher than would otherwise be possible.
What is balanced cutting used for?
Balanced cutting should be your go-to option when producing straight, round holes that are easily finished within tight tolerances. The cutting configuration’s stability allows for moderate depths of cut and deep holes, all while maintaining consistency in dimensions and surface finish. That stability also makes it ideal for high-production work situations.
4 common mistakes made with balanced cutting
- Improper stock allowance. It's common to see operators treat balanced-cutting operations as semi-finish passes, with too little material available to fully engage the insert nose radius. That suboptimal engagement inflicts radial forces on the tool, which causes the dual cutting edges to “fight” one another. This reduces stability overall, resulting in chatter during the cut.
- Poor synchronization. Speaking of cutting edges competing—when you’re engaging in balanced cutting, the cutting edges must be perfectly synced. The greater the mismatch in cutting length or diameter, the worse the resulting surface will be. Operators can compensate for poor synchronization by reducing the feed rate, but that erases one of balanced cutting’s biggest benefits.
- Insufficient chip evacuation. Unsurprisingly, two edges cutting at the same time quickly generates a lot of chips. This requires plenty of coolant and rapid chip removal. If chips aren’t evacuated fast enough, re-cutting occurs—potentially damaging the tool and the workpiece.
- Unsuitable material choices. Certain materials don’t lend themselves well to balanced cutting. Materials that work-harden, such as nickel alloys, can cause premature insert failure. On the other hand, gummier materials like aluminum can cause chip control issues, exacerbating the chip evacuation problem mentioned above.
What is stepped cutting?
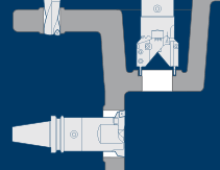
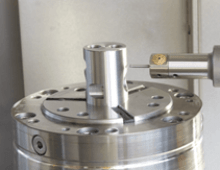
In stepped cutting, the insert cutting edges are staggered, both in length and in diameter. The result is effectively two tools in one operation. The first is a longer leading insert holder, which cuts a smaller diameter and takes half the stock per cycle. The second insert is set at the final intended size. This configuration is mostly used for larger stock allowances.
3 benefits of stepped cutting
- Heavier cuts allowed. Due to the presence of the insert mounting screw hole, an insert’s cutting edge is weakest at its cross-section. With most materials, when the radial stock allowance of a cut approaches half the width of the insert, it’s best to switch to stepped cutting. This staggers the inserts and ensures neither is subjected to heavy cutting forces at its most vulnerable point. Removing material with two cuts reduces the amount of stress on each insert, allowing for heavier cutting overall. As an added bonus, stepped cutting lowers power consumption even as it makes these heavier cuts.
- Better chip evacuation. Stepped cutting produces narrower chips, which break more easily and aren’t as difficult to evacuate from the cutting area. This helps immensely when dealing with long-chipping, gummy materials like aluminum or mild steels.
- Better size control. With stepped cutting, size control is simple—because only one of the inserts produces the final size. By contrast, in balanced cutting, maintaining the right size becomes twice as challenging. The inserts must be perfectly balanced with one another and both match the target size. In fact, stepped cutting is sometimes used as both a rough- and semi-finished pass in the same tool for this very reason.
What is stepped cutting used for?
Stepped cutting is well-suited for working with larger amounts of material and is particularly effective with gummier materials where chip control can be challenging. It excels in situations involving substantial material removal during rough machining, or when dealing with long, stringy chips.
2 common mistakes made with stepped cutting
- Incorrect step sizes. If the stock allowance is not split evenly between the inserts, the benefits of stepped cutting diminish. Even a minor inconsistency in step size can lead to uneven removal, ultimately damaging finish and accuracy in size or position. Step size must be as uniform as the combination of boring head and insert holder allows.
- Failure to account for tool deflection. Different cutting diameters mean imperfect balance, which can lead to issues in deep-hole applications. Processes may need to be re-evaluated if there’s heavy cuts to be made in longer bores.
How to choose which method is right for you
There’s no hard and fast rule when making this decision. Ask yourself these questions:
- How much time do I have?
- What material am I cutting?
- What are the project parameters?
- What’s the final product?
Weigh the answers against one another and make a decision. For example, imagine you’ve received an order for a large run of precision bearing housings. The turnaround is quick—making high speed your top consideration. But there’s a wrinkle: the housings are made out of a stainless steel alloy prone to producing long, stringy chips.
Now, picture an order for a run of aerospace components made out of a nickel-based alloy. The alloy is known to work-harden and the component geometries are complex. Step cutting’s accuracy and efficient distribution of cutting forces make it the best choice, even if you can’t finish as quickly. But the client lets you know that, if you deliver ahead of schedule, they’ll come to you first with any future orders.
In both cases, you must consider the configuration’s advantages and disadvantages, the product, the deadline and other externalities. And those are just two possibilities. In other cases, you may even start out using balanced cutting, then shift to stepped cutting as the project progresses.
Think things through and make the most informed decision possible—your workpieces will thank you for it. And to learn more about twin cutting, read our boring tool FAQ , or contact us for more information.


Mark Beaudoin
Mon, 02/05/2024 - 16:44